Ensuring One Pod Per Node — Always!
When managing large-scale containerized applications in Kubernetes, we often need a way to ensure certain pods are running on every node — for monitoring, logging, or networking purposes. That’s where DaemonSets come in.
In this article, we’ll break down what DaemonSets are, why they’re important, and walk through real-world use cases and examples to help you understand their role in the Kubernetes ecosystem.
What is a DaemonSet?
A DaemonSet is a Kubernetes controller that ensures a copy of a specific pod is running on every node (or a subset of nodes) in the cluster.
You can think of it as a background service that silently but consistently makes sure a workload runs wherever needed — like a security guard patrolling every floor of a building.
💡 Definition (from Kubernetes docs): “A DaemonSet ensures that all (or some) nodes run a copy of a Pod.”
When to Use DaemonSets
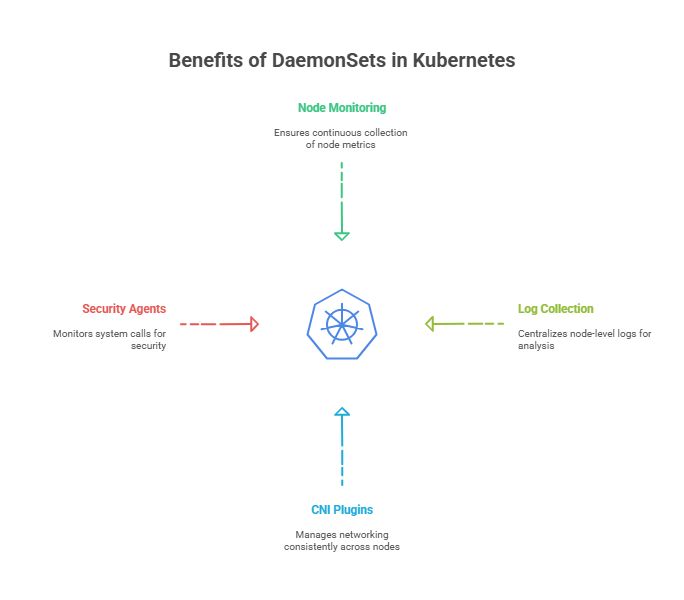
DaemonSets are ideal when you want to run a system-level pod on every node. Here are some real-world scenarios:
1. Node Monitoring
- Tools like Prometheus Node Exporter, Datadog Agent, or Zabbix require access to node metrics.
- Deploy them via DaemonSet to ensure they run on every node, collecting metrics locally.
2. Log Collection
- Tools like Fluentd, Logstash, or Filebeat need to access node-level logs.
- These agents run as DaemonSets, pulling logs from node file systems and pushing them to centralized logging backends (e.g., ELK stack).
3. CNI Plugins & Network Agents
- Kubernetes networking plugins like Calico, Cilium, or Weave require an agent on every node to manage networking.
- DaemonSets make this possible and consistent across dynamic infrastructure.
4. Security Agents
- Tools such as Falco or Sysdig monitor low-level system calls and need to be on each node.
How DaemonSets Work
When a DaemonSet is created:
- Kubernetes schedules one pod from the DaemonSet onto each eligible node.
- If a new node joins the cluster, a new pod is automatically created for that node.
- If a node is removed, the associated DaemonSet pod is cleaned up.
You don’t need to manually manage the replicas — Kubernetes does the job for you.
DaemonSet YAML Example
apiVersion: apps/v1
kind: DaemonSet
metadata:
  name: log-agent
  namespace: kube-system
spec:
  selector:
    matchLabels:
      name: log-agent
  template:
    metadata:
      labels:
        name: log-agent
    spec:
      containers:
      - name: fluentd
        image: fluent/fluentd:v1.14
        resources:
          limits:
            memory: "200Mi"
            cpu: "100m"
        volumeMounts:
        - name: varlog
          mountPath: /var/log
      volumes:
      - name: varlog
        hostPath:
          path: /var/log
This configuration deploys Fluentd as a log agent on every node in the cluster.
Targeting Specific Nodes
DaemonSets can also run pods only on selected nodes, using node selectors, taints/tolerations, or affinity rules.
spec:
  template:
    spec:
      nodeSelector:
        disktype: ssd
This ensures pods are scheduled only on nodes labeled with disktype=ssd.
Deleting a DaemonSet
kubectl delete daemonset log-agent -n kube-system
Kubernetes will automatically remove the DaemonSet pods from all nodes.
Gotchas and Tips
- Avoid conflicts with other schedulers: DaemonSet pods are managed separately and do not obey normal replica sets.
- Use priorityClassName to ensure critical DaemonSets (e.g., log collectors) aren’t evicted under resource pressure.
- For static pods, DaemonSets provide a more manageable and cloud-native alternative.
Final Thoughts
DaemonSets are essential when your workloads need to run everywhere, always. Whether you’re setting up a monitoring agent or a node-local caching service, DaemonSets are your go-to Kubernetes primitive for such tasks.
Next time you ask: How do I make sure a pod runs on all nodes? — The answer is: DaemonSet.