AWS CLI or Amazon Web Service Command Line Interface, is an open-source command-line utility tool to manage your Amazon Web Services. You can create, update, delete, or list your AWS resources using the AWS CLI. You can perform the administrative task as well using the AWS CLI.I.
Using the AWS CLI, you can directly access the AWS API. Using the combination of the Amazon Web Service Command Line Tool and shell scripting, you can create automation scripts for Amazon Web Services.
In this blog post, I will describe how to install the AWS CLI on Ubuntu through the AWS-recommended installation method. There are some prerequisites to installing AWS CLI on a Ubuntu machine.
AWS CLI Prerequisites
- AWS Account (How to Create Free AWS Account)
- Ubuntu Machine (For this demo I am using Ubuntu 22.04 LTS)
- Sudo privileged user account
AWS Recommendation For AWS CLI Installation
As per the AWS recommendation, install the AWS CLI using the installer script. AWS CLI installation using the installer script works with almost all the Linux distributions, such as Amazon Linux 1, Amazon Linux 2, CentOS, Ubuntu, and Fedora.
Install AWS CLI on Ubuntu
Step 1: Download the latest 64-bit version of AWS CLI using the curl command
sudo curl "https://awscli.amazonaws.com/awscli-exe-linux-x86_64.zip" -o "awscliv2.zip" Step 2: Use the unzip command to unzip the downloaded file. After unzip, it will create a directory name called aws and inside this folder is one installer file named ‘install’.
sudo unzip awscliv2.zipIf you found the issue “unzip: command not found” then first you need to install the unzip using the command
sudo apt install unzipStep 3: Run the installer to install aws cli
sudo ./aws/installStep 4: Check the aws cli version to verify the installation
aws --versionOutput

aws-cli/2.13.0 Python/3.11.4 Linux/5.19.0-46-generic exe/x86_64.ubuntu.22 prompt/offAnother way of installing AWS CLI is through the APT Package Manager. AWS CLI is available in the official package repository of Ubuntu 22.04 LTS. And it will install very quickly.
First, update the system packages and repository cache with the following command
sudo apt-get updateOnce the system packages are updated, run the following command to install AWS CLI.
sudo apt-get install awscli -yConfigure AWS CLI
Run the following command in your terminal to start the configuration process:
aws configureYou’ll be prompted to enter the following information:
- AWS Access Key ID: Enter your AWS access key ID. You can obtain this from the AWS Management Console by going to “My Security Credentials” in the dropdown menu under your account name.
- AWS Secret Access Key: Enter your AWS secret access key. This is associated with the access key ID you provided above.
- Default region name: Enter the AWS region you want to use by default (e.g.,
us-west-2for US West (Oregon)). You can find a list of AWS regions here: https://docs.aws.amazon.com/general/latest/gr/rande.html - Default output format: You can choose the output format for the CLI. The default is
json, but you can also usetext,table,yaml, oryaml-stream.
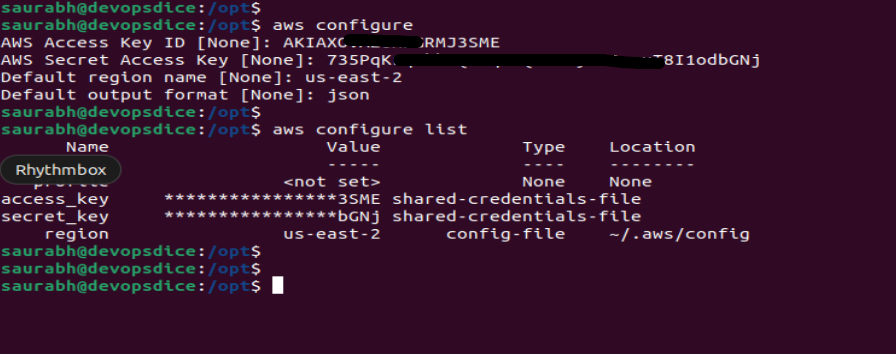
After entering the required information, the AWS CLI will validate the credentials and configuration. If everything is successful, you should see a confirmation message.
Now your AWS CLI is configured and ready to use. You can start running AWS CLI commands to interact with various AWS services.