Kubernetes is a powerful container orchestration tool that allows you to manage, scale, and deploy applications efficiently. When rolling out new versions of an application, choosing the right deployment strategy is crucial to ensuring minimal downtime, avoiding service disruption, and enabling smooth rollbacks in case of failures.
In this blog post, we will explore various deployment strategies in Kubernetes, their use cases, and practical examples.
1. Recreate Deployment Strategy
The Recreate Deployment Strategy is the simplest way to roll out new changes in Kubernetes. It works by terminating all existing pods of an application before starting new ones with the updated version. This results in some downtime but ensures a clean deployment without overlapping versions.

How the Recreate Deployment Strategy Works
- Terminate Old Pods – All running instances of the application are stopped.
- Deploy New Pods – The updated version of the application is started.
- New Pods Become Available – Once all new pods are running, they start handling traffic.
Since the application experiences downtime during deployment, this strategy is best suited for non-critical applications where brief service interruptions are acceptable.
When to Use the Recreate Strategy
- Applications that do not require high availability.
- Use cases where maintaining data consistency is critical (e.g., databases).
- When major architectural changes make rolling updates impractical.
Example: Recreate Deployment in Kubernetes
Below is a Kubernetes Deployment manifest using the Recreate strategy.
apiVersion: apps/v1
kind: Deployment
metadata:
  name: my-app
spec:
  replicas: 3
  strategy:
    type: Recreate
  template:
    metadata:
      labels:
        app: my-app
    spec:
      containers:
      - name: my-app
        image: my-app:v2
Explanation:
- The
strategy.typeis set toRecreate, meaning all existing pods will be deleted before new ones are created. - The
replicas: 3ensures three instances of the application run once the deployment is complete. - The container uses the
my-app:v2image, which represents the updated version.
2. Rolling Update Deployment Strategy
The Rolling Update Deployment Strategy is the default deployment method in Kubernetes. It gradually replaces old pods with new ones, ensuring that a portion of the application remains available at all times, minimizing downtime.

How the Rolling Update Strategy Works
- Create New Pods: A few new pods with the updated version are deployed alongside existing ones.
- Terminate Old Pods: As new pods become available, a few old ones are terminated.
- Repeat Until Completion: This process continues in batches until all old pods are replaced with new ones.
Since the application remains partially available throughout the deployment, Rolling Updates are ideal for production environments requiring high availability.
When to Use the Rolling Update Strategy
- Suitable for web applications, APIs, and microservices.
- Ensures zero downtime by keeping some instances active during updates.
- Allows controlled rollouts and easy rollback in case of issues.
Example: Rolling Update Deployment in Kubernetes
Here is a Kubernetes Deployment manifest using the Rolling Update strategy:
apiVersion: apps/v1
kind: Deployment
metadata:
  name: my-app
spec:
  replicas: 3
  strategy:
    type: RollingUpdate
    rollingUpdate:
      maxUnavailable: 1  # Number of pods that can be unavailable during update
      maxSurge: 1        # Number of extra pods to create during update
  selector:
    matchLabels:
      app: my-app
  template:
    metadata:
      labels:
        app: my-app
    spec:
      containers:
      - name: my-app
        image: my-app:v2  # New version of the application
Explanation:
- The
strategy.typeis set toRollingUpdate, which ensures a gradual replacement. maxUnavailable: 1ensures that at most one pod is unavailable at a time.maxSurge: 1allows Kubernetes to create one extra pod temporarily during the update.- The deployment starts with v1 and gradually replaces old pods with v2 while maintaining availability.
3. Blue-Green Deployment Strategy
The Blue-Green Deployment Strategy is a release management approach that minimizes downtime and risk by running two identical environments:
- Blue (Current Version): The live, production environment currently serving users.
- Green (New Version): The updated environment that is tested before being switched to production.
Once the Green environment is verified, traffic is redirected from Blue to Green, making the new version live instantly. If any issues arise, traffic can be quickly reverted back to Blue.

How the Blue-Green Deployment Strategy Works
- Blue (v1) is Active – The current version is running and handling all traffic.
- Deploy Green (v2) – A separate, identical environment is created for the new version.
- Test Green (v2) – The new version undergoes testing without affecting production.
- Switch Traffic – Once verified, traffic is routed from Blue (v1) to Green (v2).
- Monitor & Rollback (if needed) – If issues arise, traffic is reverted to Blue.
When to Use Blue-Green Deployment
- Applications requiring zero downtime deployment.
- Use cases where quick rollback is necessary.
- Mission-critical applications where failures must not affect users.
- Scenarios requiring testing in a live-like environment before release.
Considerations:
- Requires double the infrastructure temporarily (both Blue & Green run simultaneously).
- Needs proper traffic routing (e.g., Kubernetes Services or Ingress).
Example: Blue-Green Deployment in Kubernetes
Here’s how Blue-Green Deployment can be implemented using Kubernetes Services:
Step 1: Deploy the “Blue” (Current Version)
apiVersion: apps/v1
kind: Deployment
metadata:
  name: my-app-blue
spec:
  replicas: 3
  selector:
    matchLabels:
      app: my-app
      version: blue
  template:
    metadata:
      labels:
        app: my-app
        version: blue
    spec:
      containers:
      - name: my-app
        image: my-app:v1  # Current (Blue) version
Step 2: Deploy the “Green” (New Version)
apiVersion: apps/v1
kind: Deployment
metadata:
  name: my-app-green
spec:
  replicas: 3
  selector:
    matchLabels:
      app: my-app
      version: green
  template:
    metadata:
      labels:
        app: my-app
        version: green
    spec:
      containers:
      - name: my-app
        image: my-app:v2  # New (Green) version
Step 3: Use a Service to Route Traffic
apiVersion: v1
kind: Service
metadata:
  name: my-app-service
spec:
  selector:
    app: my-app
    version: blue  # Initially pointing to the Blue version
  ports:
    - protocol: TCP
      port: 80
targetPort: 8080- Initially, this service routes traffic to Blue (v1).
- Once Green (v2) is verified, update the
selector.versiontogreento switch traffic.
Step 4: Switching Traffic to Green
Update the Service selector to route traffic to Green:
spec:
  selector:
    app: my-app
version: green # Now pointing to the Green version- This instantly shifts all users to v2 without downtime.
- If issues arise, switch back to
version: blueto rollback.
4. Canary Deployment Strategy
What is Canary Deployment?
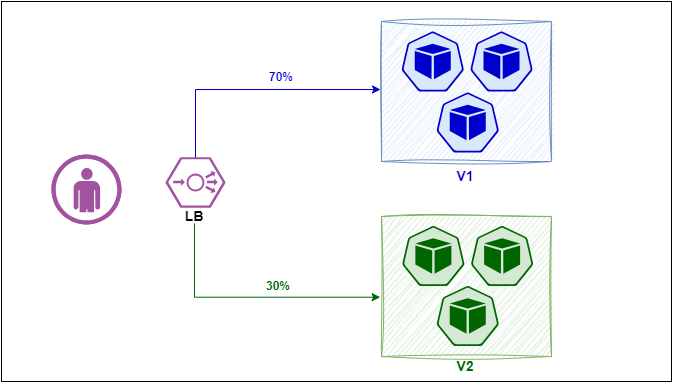
The Canary Deployment Strategy is a progressive rollout technique where a small subset of users receives the new application version (the “canary”), while the rest continue using the stable version. If the new version performs well, it is gradually rolled out to the entire user base. If issues arise, it can be quickly rolled back with minimal impact.
How the Canary Deployment Strategy Works
- Deploy Canary (New Version) to a Small Subset – A small percentage of traffic is routed to the canary version.
- Monitor Performance & Stability – Track errors, latency, and logs.
- Gradual Increase in Traffic to Canary – If no issues are found, scale up the Canary deployment.
- Full Rollout or Rollback – If the canary version proves stable, shift all traffic to it. Otherwise, remove the canary and revert to the stable version.
When to Use Canary Deployment
- Useful for reducing risk by testing in a live environment.
- Ideal for feature rollouts and A/B testing.
- Works well in high-availability applications where downtime is unacceptable.
- Helps identify performance issues before a full release.
Considerations
- Requires traffic splitting (e.g., using Ingress, Service Mesh, or Load Balancer).
- More complex than rolling updates due to gradual rollout.
Example: Canary Deployment in Kubernetes
A Canary Deployment can be implemented using two Deployments and a Service to split traffic.
Step 1: Deploy the Stable (Existing) Version
apiVersion: apps/v1
kind: Deployment
metadata:
  name: my-app-stable
spec:
  replicas: 3
  selector:
    matchLabels:
      app: my-app
      version: stable
  template:
    metadata:
      labels:
        app: my-app
        version: stable
    spec:
      containers:
      - name: my-app
        image: my-app:v1  # Current stable version
Step 2: Deploy the Canary (New Version)
apiVersion: apps/v1
kind: Deployment
metadata:
  name: my-app-canary
spec:
  replicas: 1  # Canary version starts with a single replica
  selector:
    matchLabels:
      app: my-app
      version: canary
  template:
    metadata:
      labels:
        app: my-app
        version: canary
    spec:
      containers:
      - name: my-app
        image: my-app:v2  # New canary version
Step 3: Use a Service to Split Traffic
apiVersion: v1
kind: Service
metadata:
  name: my-app-service
spec:
  selector:
    app: my-app
  ports:
    - protocol: TCP
      port: 80
targetPort: 8080- By default, Kubernetes Services round-robin traffic across all matching pods.
- Initially, most requests go to
stable, with a small percentage reachingcanary. - Traffic distribution can be refined using an Ingress Controller or a Service Mesh (e.g., Istio, Linkerd).
Step 4: Gradually Increase Traffic to Canary
- Scale the
my-app-canaryDeployment from 1 to 2 to 5… instances. - Monitor errors, logs, and performance.
- If stable, replace the stable version with the canary (full rollout).
- If issues arise, remove the canary and rollback to the stable version.
5. A/B Testing Deployment Strategy
What is A/B Testing Deployment?
The A/B Testing Deployment Strategy is a controlled release technique where different subsets of users receive different application versions. It helps test new features, performance improvements, or UI changes by analyzing user behavior before a full rollout.
Unlike Canary Deployment, which gradually shifts all traffic to a new version, A/B Testing keeps multiple versions running simultaneously, directing users based on specific criteria (e.g., user location, device type, session cookies).

How A/B Testing Deployment Works
- Deploy Multiple Versions – At least two versions (e.g., A = stable, B = new) are running in parallel.
- Route Traffic Based on User Attributes – A/B testing tools, Ingress controllers, or service meshes control the traffic split.
- Collect & Analyze Metrics – Track user engagement, error rates, and feedback.
- Decide Next Steps – If version B performs better, it becomes the primary version; otherwise, it is discarded.
When to Use A/B Testing Deployment
- Ideal for feature testing before a full rollout.
- Useful for UI/UX improvements and conversion optimization.
- Helps validate performance optimizations without impacting all users.
- Allows data-driven decision-making before a final release.
Considerations
- Requires traffic segmentation tools (e.g., Istio, Nginx, API Gateway).
- Needs proper analytics to evaluate results.
- More complex than Canary Deployment as multiple versions remain live.
Example: A/B Testing Deployment in Kubernetes
A/B Testing can be implemented using two Deployments, an Ingress Controller, and a Traffic Split Rule.
Step 1: Deploy Version A (Stable Version)
apiVersion: apps/v1
kind: Deployment
metadata:
  name: my-app-v1
spec:
  replicas: 3
  selector:
    matchLabels:
      app: my-app
      version: v1
  template:
    metadata:
      labels:
        app: my-app
        version: v1
    spec:
      containers:
      - name: my-app
        image: my-app:v1  # Stable version
Step 2: Deploy Version B (New Version for Testing)
apiVersion: apps/v1
kind: Deployment
metadata:
  name: my-app-v2
spec:
  replicas: 2  # Fewer replicas for initial testing
  selector:
    matchLabels:
      app: my-app
      version: v2
  template:
    metadata:
      labels:
        app: my-app
        version: v2
    spec:
      containers:
      - name: my-app
        image: my-app:v2  # New experimental version
Step 3: Use Ingress Controller to Route Traffic
A typical Ingress configuration for A/B Testing using header-based traffic routing:
apiVersion: networking.k8s.io/v1
kind: Ingress
metadata:
  name: my-app-ingress
  annotations:
    nginx.ingress.kubernetes.io/rewrite-target: /
    nginx.ingress.kubernetes.io/configuration-snippet: |
      if ($http_user_type = "test-group") {
        set $service_version "v2";
      }
      if ($http_user_type != "test-group") {
        set $service_version "v1";
      }
spec:
  rules:
  - host: myapp.example.com
    http:
      paths:
      - path: /
        pathType: Prefix
        backend:
          service:
            name: my-app-service
            port:
number: 80- Header-based Routing: Users with the
user_type=test-groupheader are routed to v2. - Default Users: All other users are directed to v1.
Step 4: Split Traffic Using a Service Mesh (Istio)
If using Istio for A/B Testing, define a VirtualService to split traffic:
apiVersion: networking.istio.io/v1alpha3
kind: VirtualService
metadata:
  name: my-app
spec:
  hosts:
  - myapp.example.com
  http:
  - match:
    - headers:
        user-group:
          exact: "beta-testers"
    route:
    - destination:
        host: my-app-v2
        subset: v2
  - route:
    - destination:
        host: my-app-v1
subset: v1- Beta testers receive v2.
- Default users continue using v1.
6. Shadow Deployment Strategy
The Shadow Deployment Strategy allows the new version of an application to receive real-world traffic without impacting actual users. Unlike Canary or Blue-Green deployment, Shadow Deployment does not serve live user responses—it only mirrors the traffic to the new version for testing purposes.

This technique helps developers test new features under real traffic conditions while keeping the existing version live for users.
How the Shadow Deployment Strategy Works
- Deploy the Stable Version (Primary App Serving Users).
- Deploy the Shadow Version (New App Version Not Exposed to Users).
- Mirror Traffic – Incoming requests to the stable app are duplicated and sent to the shadow version.
- Analyze Performance & Stability – Developers monitor logs, errors, latency, and impact without affecting real users.
- Decide Next Steps – If the shadow version performs well, it can be fully deployed as the primary version. If issues arise, they can be fixed without user disruption.
When to Use Shadow Deployment
- Ideal for testing new versions in a production-like environment.
- Suitable for performance testing, debugging, and load testing.
- Allows teams to experiment without breaking live services.
- Useful for AI/ML applications that need real-world data testing.
Considerations
- Traffic mirroring can increase system load since requests are duplicated.
- Requires a traffic management tool (e.g., Istio, Envoy, Nginx).
- The shadow version must not send responses to users.
Example: Shadow Deployment in Kubernetes
A Shadow Deployment requires two Deployments (Stable & Shadow) and a Service Mesh to mirror traffic.
Step 1: Deploy the Stable (Current) Version
apiVersion: apps/v1
kind: Deployment
metadata:
  name: my-app-stable
spec:
  replicas: 3
  selector:
    matchLabels:
      app: my-app
      version: stable
  template:
    metadata:
      labels:
        app: my-app
        version: stable
    spec:
      containers:
      - name: my-app
        image: my-app:v1  # Current stable version
This is the version that actively serves users.
Step 2: Deploy the Shadow (New) Version
apiVersion: apps/v1
kind: Deployment
metadata:
  name: my-app-shadow
spec:
  replicas: 2
  selector:
    matchLabels:
      app: my-app
      version: shadow
  template:
    metadata:
      labels:
        app: my-app
        version: shadow
    spec:
      containers:
      - name: my-app
image: my-app:v2 # New version (not exposed to users)- This version does not directly receive user traffic.
- Traffic will be mirrored to this version for testing.
Step 3: Mirror Traffic Using Istio
To implement Shadow Deployment, we need an Istio VirtualService to mirror traffic.
apiVersion: networking.istio.io/v1alpha3
kind: VirtualService
metadata:
  name: my-app
spec:
  hosts:
  - myapp.example.com
  http:
  - route:
    - destination:
        host: my-app-stable
        subset: stable
    mirror:
      host: my-app-shadow
subset: shadow- Incoming requests go to
my-app-stable(live version).The same requests are mirrored tomy-app-shadow(new version). - The shadow version logs all requests but does not send responses.
Step 4: Monitor & Analyze Results
Key Metrics to Track:
- Performance comparison (latency, response time).
- Error rates & logs in the shadow version.
- Database impact (if applicable).
- Resource utilization to check system load.
If no issues are detected, the shadow version can be promoted to live. If problems arise, they are fixed before affecting users.