Introduction
Managing deployments across multiple AWS environments (dev, staging, production) securely is one of the biggest challenges for modern DevOps teams. Traditionally, teams relied on long-lived AWS access keys stored as GitHub secrets. While functional, this approach is risky—leaked or outdated credentials can expose your infrastructure to unauthorized access.
In this article, we’ll explore how OIDC works, why it’s better than static secrets, and how you can set it up for multi-environment deployments in AWS using GitHub Actions.
Why OIDC is the Right Default for GitHub → AWS
Traditional CI/CD often stores AWS credentials in GitHub Secrets. That works, but it’s risky:
- Secrets can be exfiltrated via logs, misconfigurations, or compromised runners
- Keys are long-lived (or “rotated later” in theory)
- Auditing who used a key is harder than auditing role sessions
With OIDC, GitHub provides a short-lived signed identity token to the workflow. AWS validates it and issues temporary credentials via STS for a specific IAM role. Benefits:
- No static keys in GitHub
- Short session duration (minutes to an hour)
- Strong constraints via trust policy (repo, branch, environment)
- Better auditing in CloudTrail (AssumeRoleWithWebIdentity)
How does it work?
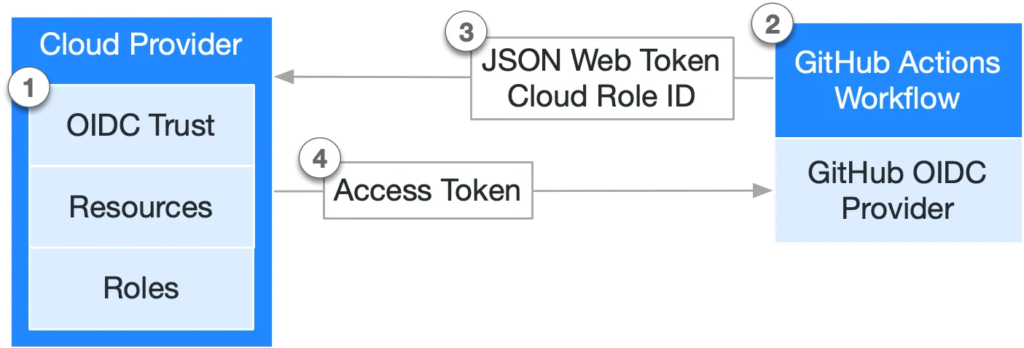
- AWS establishes an OIDC trust relationship between the IAM role and your GitHub workflow, scoped to your GitHub org/user and/or repository.
- Whenever the workflow runs, GitHub issues an OIDC token.
- The workflow submits that token to AWS STS.
- AWS verifies the token’s claims and, if valid, returns short-lived temporary credentials.
Cool, let’s get our hands dirty.
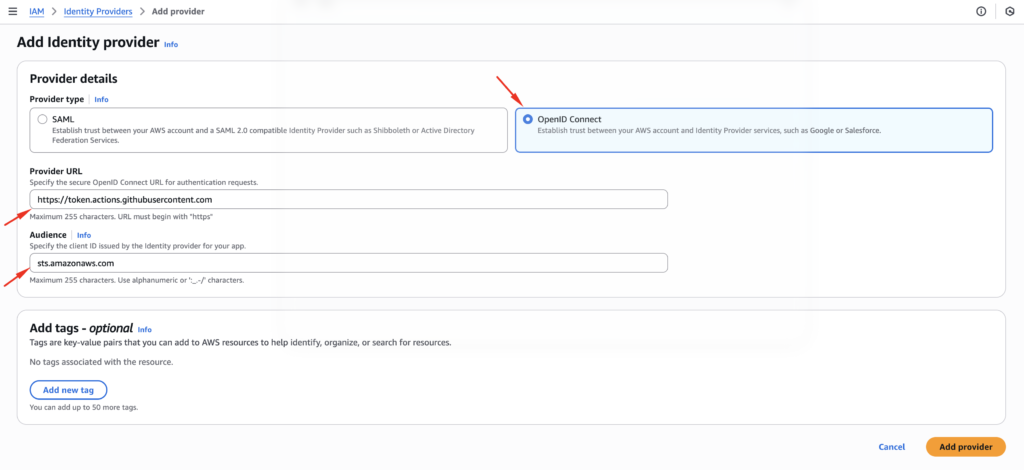
Step 1: Create the GitHub OIDC Provider in AWS
In each AWS account that GitHub Actions will deploy into, create an IAM OIDC provider:
- Provider URL:
https://token.actions.githubusercontent.com - Audience:
sts.amazonaws.com
You can do this in console or IaC (Terraform/CloudFormation). The important part is: AWS must trust GitHub’s issuer.
Step 2: Define Environment-Specific IAM Roles (Dev / Stage / Prod)
Create one role per environment (and often per repository). Example naming:
gha-deploy-dev-myappgha-deploy-staging-myappgha-deploy-prod-myapp
Why separate roles?
- Easier incident containment and auditing
- Different permissions per environment
- Different trust constraints per environment (branch rules, environments, tags)
Step 3: Lock Down the Trust Policy (This is the Real Security)
Now we need to grant the necessary permissions to the identity provider we created so it can deploy into our AWS account. To do that, we’ll create an IAM role—go to IAM → Roles, then click Create role and select custom trust policy.
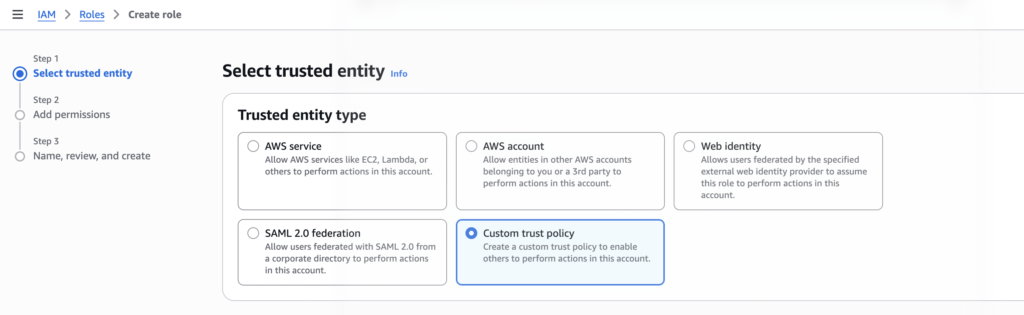
The trust policy controls who can assume the role.
Key GitHub OIDC claims you’ll typically use
iss: issuer (GitHub)aud: should bests.amazonaws.comsub: “subject” identifying repo and ref inforepository: org/reporef: branch or tagenvironment: GitHub environment name (if used)
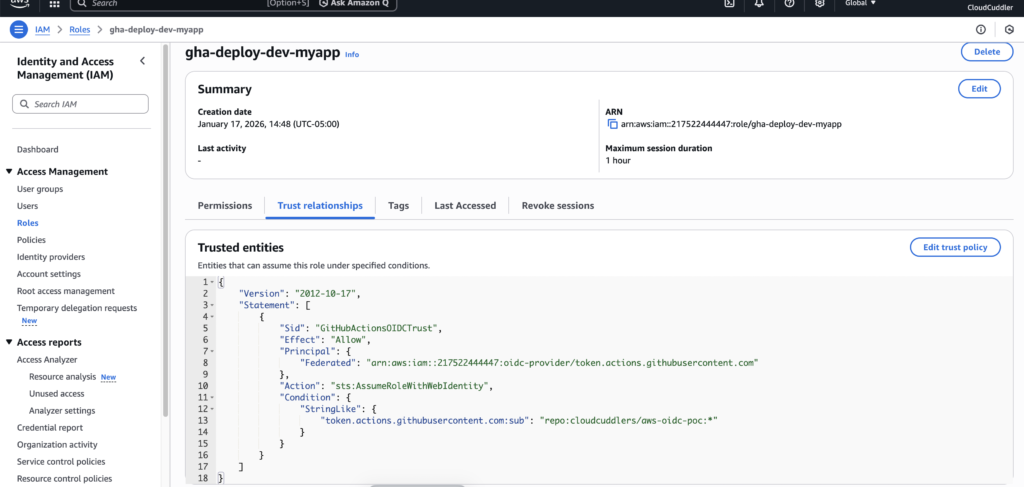
Example trust policy (recommended starting point)
This policy allows only a specific repo to assume the role, and only from a specific branch (or tag), and only with correct audience:
{
  "Version": "2012-10-17",
  "Statement": [
    {
      "Sid": "GitHubActionsOIDCTrust",
      "Effect": "Allow",
      "Principal": {
        "Federated": "arn:aws:iam::123456789012:oidc-provider/token.actions.githubusercontent.com"
      },
      "Action": "sts:AssumeRoleWithWebIdentity",
      "Condition": {
        "StringEquals": {
          "token.actions.githubusercontent.com:aud": "sts.amazonaws.com",
          "token.actions.githubusercontent.com:repository": "YOUR_ORG/YOUR_REPO"
        },
        "StringLike": {
          "token.actions.githubusercontent.com:sub": "repo:YOUR_ORG/YOUR_REPO:enviornment:ENV"
        }
      }
    }
  ]
}
Better: use GitHub Environments for prod gating
If you use GitHub Environments (e.g., prod requires approvals), you can trust environment too. Then only workflows that explicitly target environment: prod can assume the prod role.
For this demo, you can attach a basic policy like AmazonS3FullAccess. In a real-world setup, you should restrict permissions to the minimum required (least privilege).
Now review the role settings and create it. It’s a good idea to name the role based on the target environment (dev/stage/prod) to keep deployments easier to manage.
Step 4: Build a Secure GitHub Actions Workflow
Below is a clean example using:
- Branch-based deployment rules
permissions: id-token: write(required for OIDC)- GitHub Environments to separate dev/stage/prod
- Separate AWS roles for each environment
Sample Workflow file
name: OIDC Dev Validation
on:
workflow_dispatch:
push:
branches: [ "main" ]
permissions:
id-token: write # REQUIRED for OIDC
contents: read
jobs:
validate-dev-oidc:
if: github.ref == 'refs/heads/dev'
runs-on: ubuntu-latest
environment: dev
steps:
- uses: actions/checkout@v4
- name: Configure AWS credentials via OIDC (Dev role)
uses: aws-actions/configure-aws-credentials@v4
with:
role-to-assume: arn:aws:iam::217522444447:role/gha-deploy-dev-myapp
aws-region: us-east-1
role-session-name: gha-dev-oidc-validate
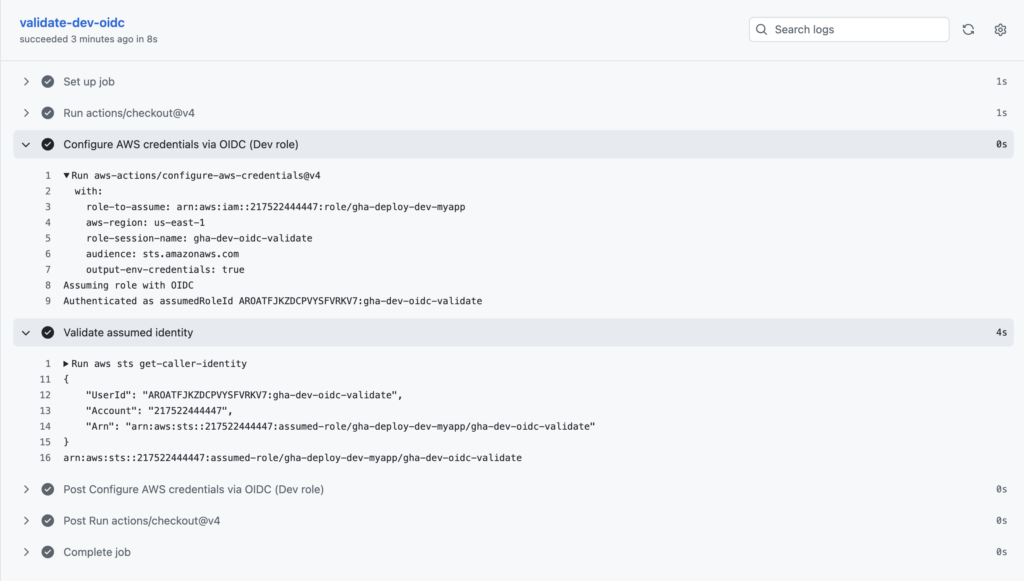
- name: Validate assumed identity
run: |
aws sts get-caller-identity
aws sts get-caller-identity --query Arn --output textOutput when the workflow runs from the dev branch:
Securing multi-environment AWS deployments no longer has to be a headache laden with long-lived credentials. By embracing the powerful combination of GitHub Actions and OpenID Connect, you can build a CI/CD pipeline that is not only efficient and automated but also inherently secure. This approach minimizes your attack surface, simplifies credential management, and ensures that your deployments adhere to the principle of least privilege. Implement this today and experience the peace of mind that comes with a truly secure and streamlined deployment process.